Curl Noise Explorations With IlluGen
By Nick Seavert
- Time To Read: ~15 Minutes
- Last Updated: Friday, February 6th, 2026
All examples and figures below can be viewed with Illugen via these project files:
Introduction
Curl noise is a useful tool for creating fluid like textures and patterns without going through the trouble of creating an actual fluid simulation. There are many potential ways it can help you generate unique assets for your visual effects and we'll be going over some of my experiments later in this article. Curl noise is the result of a mathematical operation to find the rotation of a 2d vector at any given point on a base grayscale input such as Perlin noise. In this article, Ryan Smith says "... This creates a vector field where, instead of the vectors moving along the slope, it curls AROUND the slope, hence the name “Curl”."
The resulting curl noise can then be used to distort other texture inputs and these fields can be animated over time and blended together to have layers of detail. One important note about curl noise is that it is non-divergent which ensures that the same amount of stuff moving into the field is moving out of the field. Divergence is a measure of local (meaning at or around a point) expansion (positive divergence) or contraction (negative divergence) and can be visualized in Fig. 1. We will explore curl noise with and without divergence as some levels of divergence can bode more artistic and natural results.
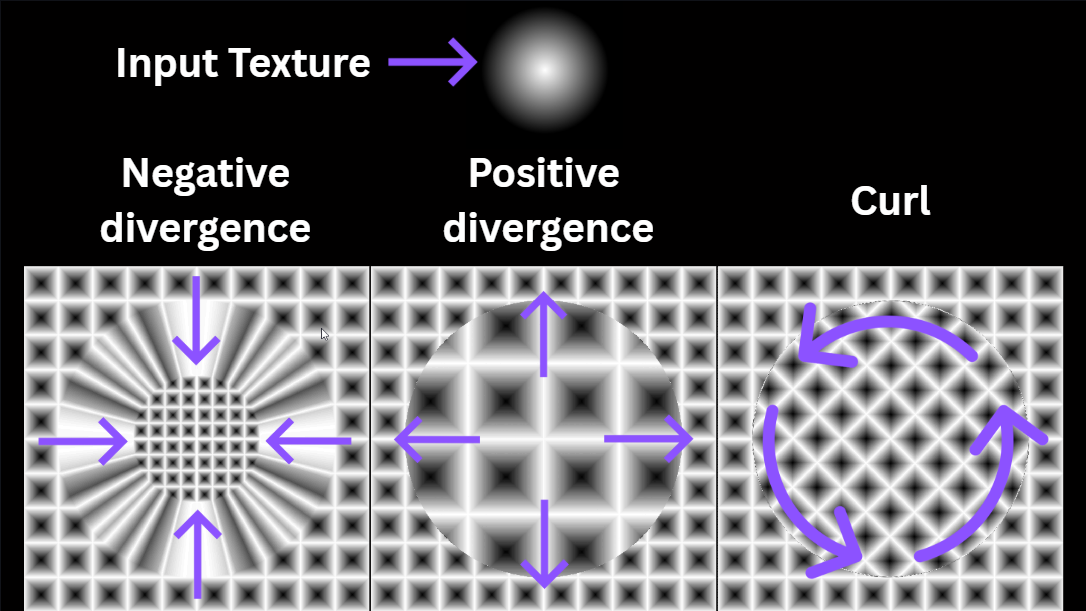
Fig. 1 - We can easily visualize divergence and curl with IlluGen
Lets Start By Generating Curl Noise in IlluGen
In a tool like Substance Designer you can warp textures with normal map inputs, however, in IlluGen we use UV texture coordinates to perform warp operations. In Fig. 2 we plug a Grid texture into a directional blur and this is the texture we will be distorting. Our directional blur node works similar to substance designers vector morph node in this case. The Directional blur node has a 50% warp intensity and a forward only sample distribution. To generate the curl noise field we take an input, in this case a Perlin noise field with 4 octaves, and derive a UV from the heightmap. That alone would only give us vectors traversing the slope so we need to use the rotation parameter in the UV from Derivative node to rotate the vectors in one direction, in this case 90°. To ensure the noise is divergence free we then need to use a levels node to inverse our Noise input and you can do this by flipping the remap curve in the node. We take the inverted noise and plug it into our intensity mod pin, and we do this because to accurately compute our curl we need to map the intensity of our distortion to the amount of curl present. The intensity mod pin can be exposed by clicking the sine wave icon in the intensity input box. When the UV is plugged into the directional blur, you get what we see in Fig. 3. Congrats, you just made curl noise!
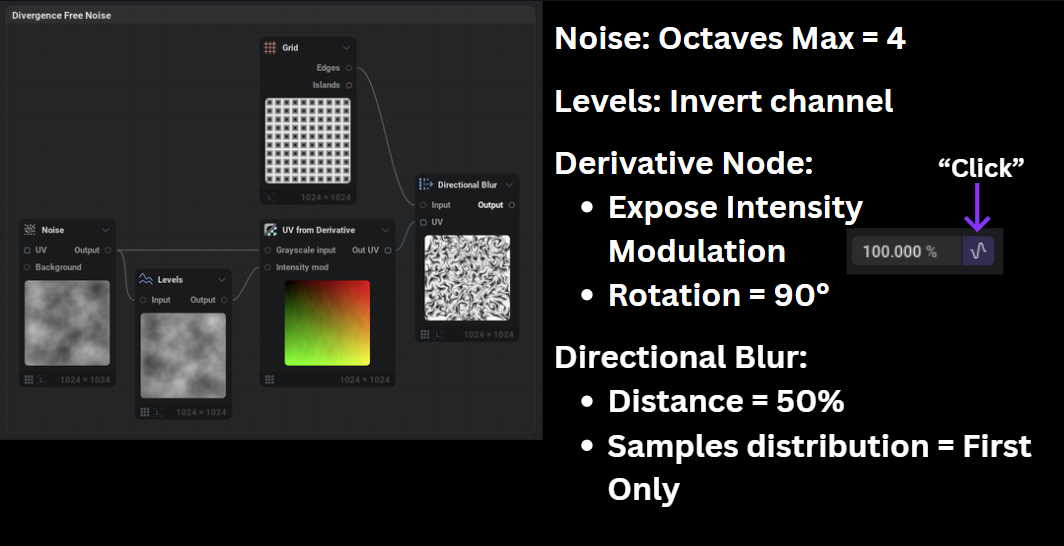
Fig. 2 - Divergence free noise creation
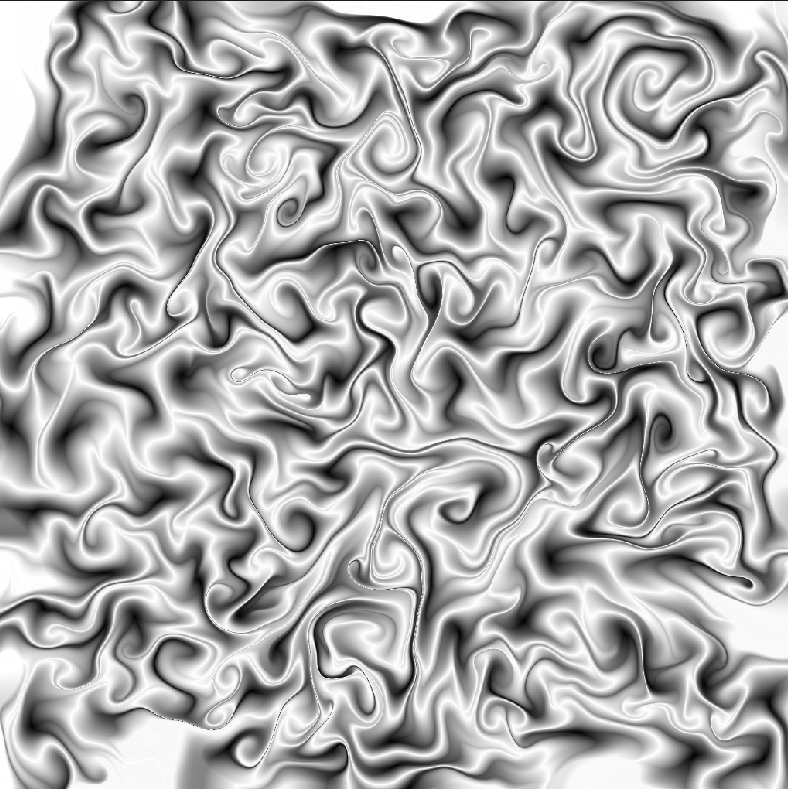
Fig. 3 - The resulting curl noise texture, cool!
Insight #1 - Blurry inputs are better for generating curl & swirls
In Fig. 4 we show an animated example of the curl generating noise gaining progressively more octaves. Controlling how many octaves noise has, its scale, applying gaussian blur, and so on are all things that greatly affect your end result. I have found that having a blurry texture gives the curl more gradient variation to work with and results in better swirls. In Fig. 5 we scale the noise over time which acts similarly to adding additional octaves. By balancing your octaves and scale, you can hone in on the amount of swirls and detail that works for you.
Fig. 4 - Animated octaves of the noise that we are deriving curl from
Fig. 5 - Scaling the noise introduces varying levels of detail
Insight #2: Use divergence to your advantage
We learned above that positive and negative divergence push and pull our pixels and though curl noise by default is divergence free when rotating your UV's by 90°, we add positive or negative divergence by deviating from this value. In Fig. 6 we animate our UV rotation from 60° to 120° to give you an idea of usable rotation ranges when generating your assets. If you want to flip the direction of the curls you could use -120° to -60°.
Fig. 6 - Animating UV rotation adds divergence to our to our texture, creating pinching of colors.
Another, potentially more artistic way to add more divergence is to not modulate the intensity of your UV. When you do this, you're not exactly staying true to what curl noise is, but this allows you to create more intense color variations as seen in Fig. 7. This happens because we are applying whatever your UV intensity value is to the entire gradient of your input noise. You'll notice that the variation without modulation has very defined islands of color and sharp edges. If you keep modulation on, a similar effect could be achieved by increasing your UV intensity above 100%.
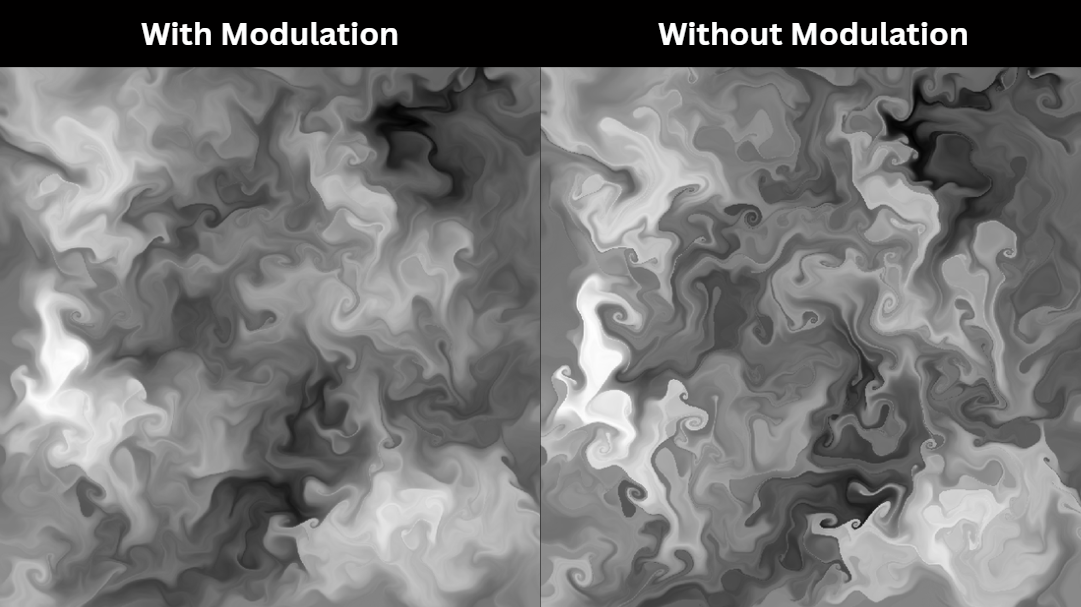
Fig. 7 - 80 Degree UV rotation with and without modulation
Insight #3: Your color variation is highly dependent upon what you are warping, not just your curl noise input.
Remember that what we're seeing isn't the curl noise color itself, but an image warped by the velocity field of that curl noise. So lets see what happens when we use a few different patterns. In Fig. 8 we warp a series of colored dots laid out in a grid, In Fig. 9 we warp a Voronoi noise pattern, and In Fig. 10 we warp an edge detected noise pattern. In these figures the warp amounts and noise scales are not the same, I just played with my values until I generated something cool enough for each. I provided the file that contains all of these figures, you can easily warp them all with the same curl noise to investigate if you are curious enough.
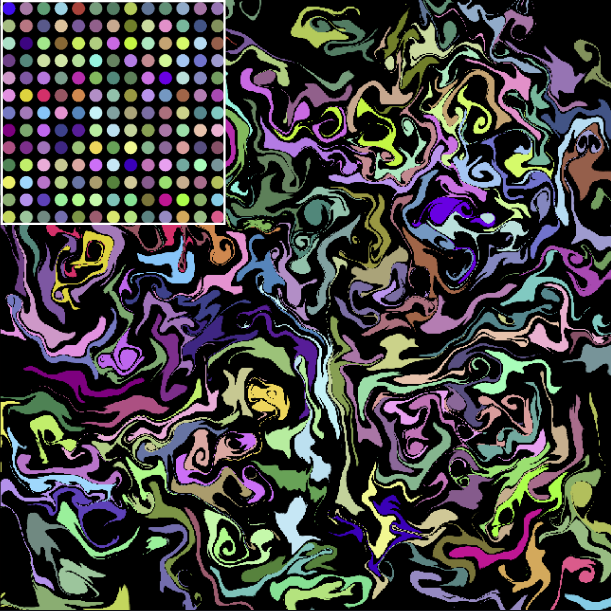
Fig. 8 - Warped colored dots in a grid with medium frequency curl
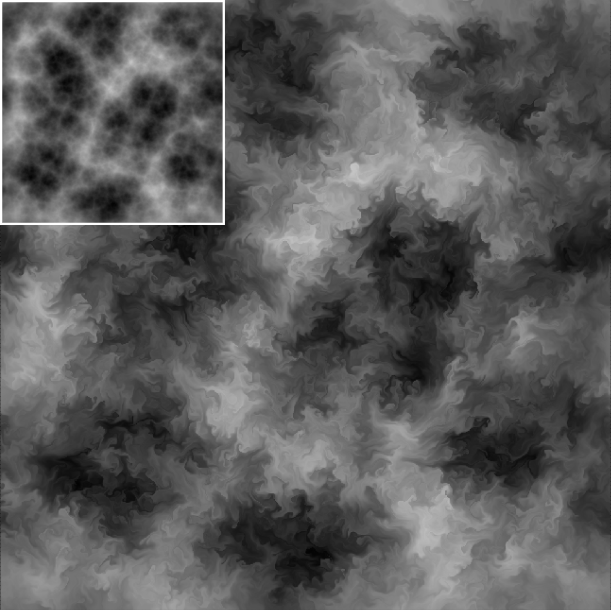
Fig 9. - Warped Voronoi noise with a high frequency curl
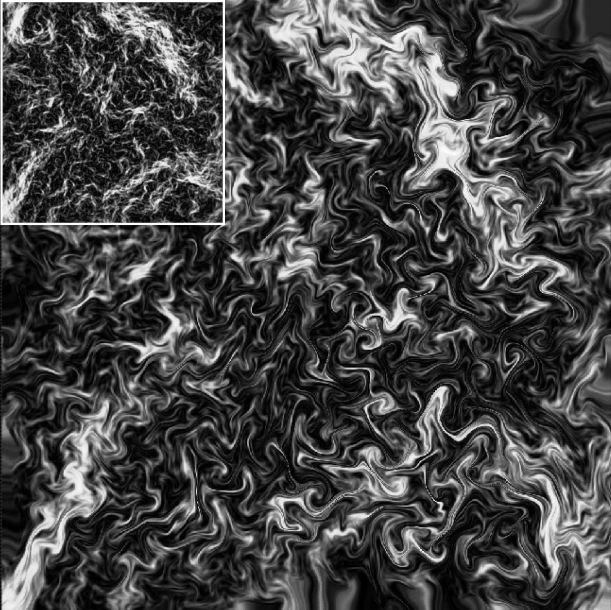
Fig 10. - Edge detected noise with a divergent free curl
Next, I wondered what would happen if we used the same exact noise for generating the curl noise UV and for the pattern thats being warped. We know that perfect curl would simply rotate affected pixel positions as seen in Fig. 1. In Fig. 11 we get to see an interesting stringing/brush stroke effect by using this method.
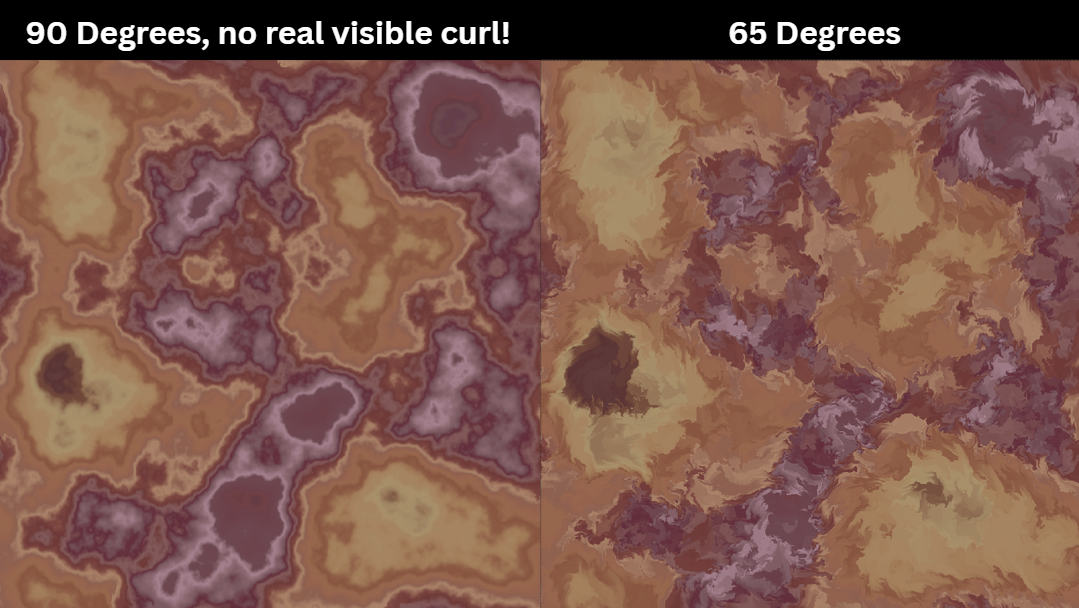
Fig 11. - Same curl & pattern inputs create a brush stroke look
Insight #4: Blending methods to achieve more detail or multi-directional curl
So far we've used a very simple node graph to generate our curl noise, but what are some of the different ways we could add additional blending steps to produce more interesting results?
One of my first thoughts was, what would happen if I use a final curl noise output as an input to generate a new curl noise? Multi-pass curl anyone? This can be seen in Fig. 12 A and B. It's definitely cool as an art piece, but this method results in very high sharpness depending on your intensity settings.
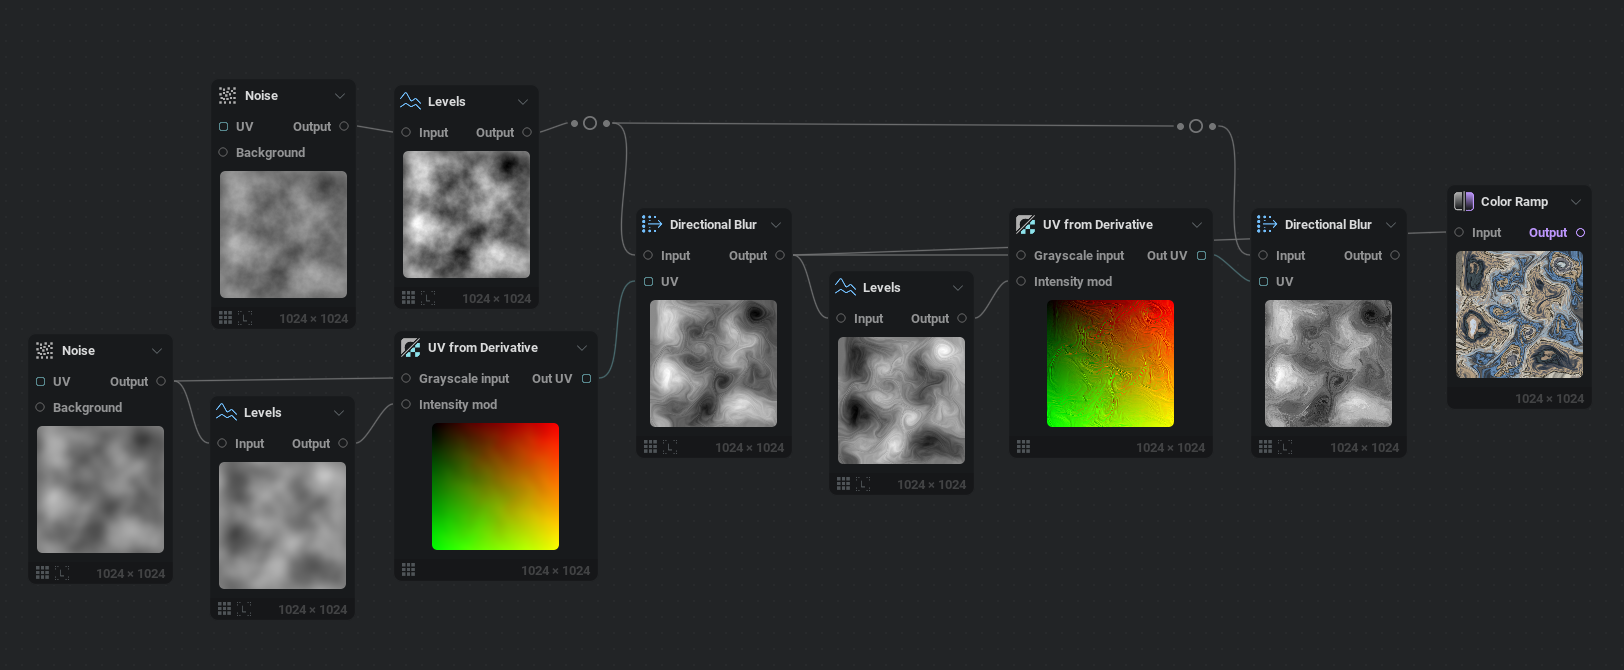
Fig. 12A - What happens if we use curl noise to generate more curl noise?
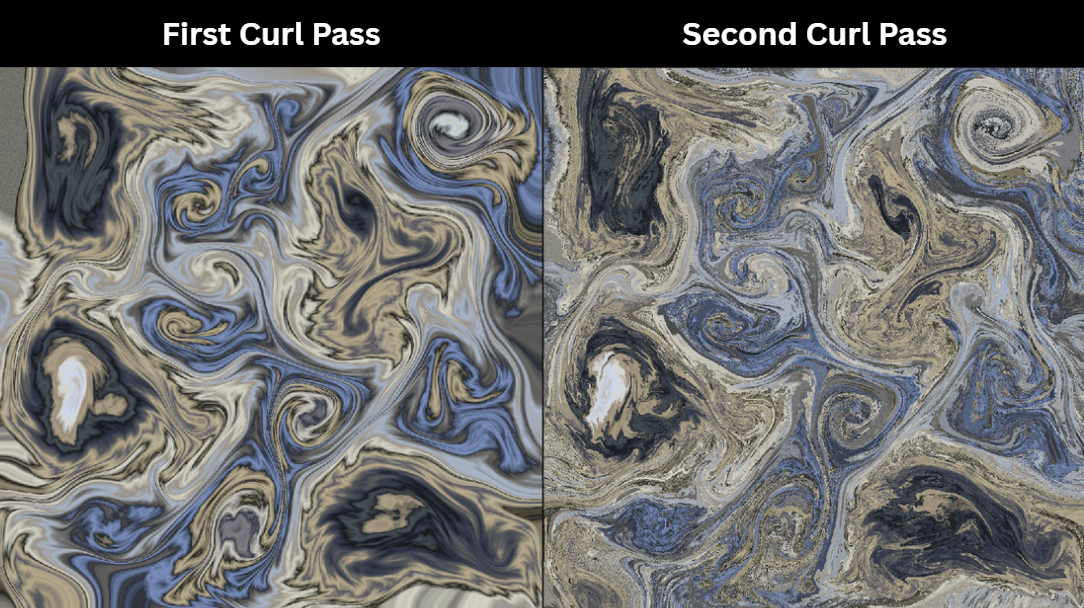
Fig. 12B - Result of injecting curl into curl
Next, I was wondering if there was a way to guarantee both clockwise and counter clockwise curls for far more variety. If we take an 80 degree UV and a -80 degree UV and subtractively blend these two curl calculations together, we can get some very cool liquid or Jupiter like results as seen in Fig. 13A and Fig. 13B shows our node setup. Two different results come from how your pins are ordered in your UV blend node. Neither result is more right than the other, but feel free to swap the order as needed.
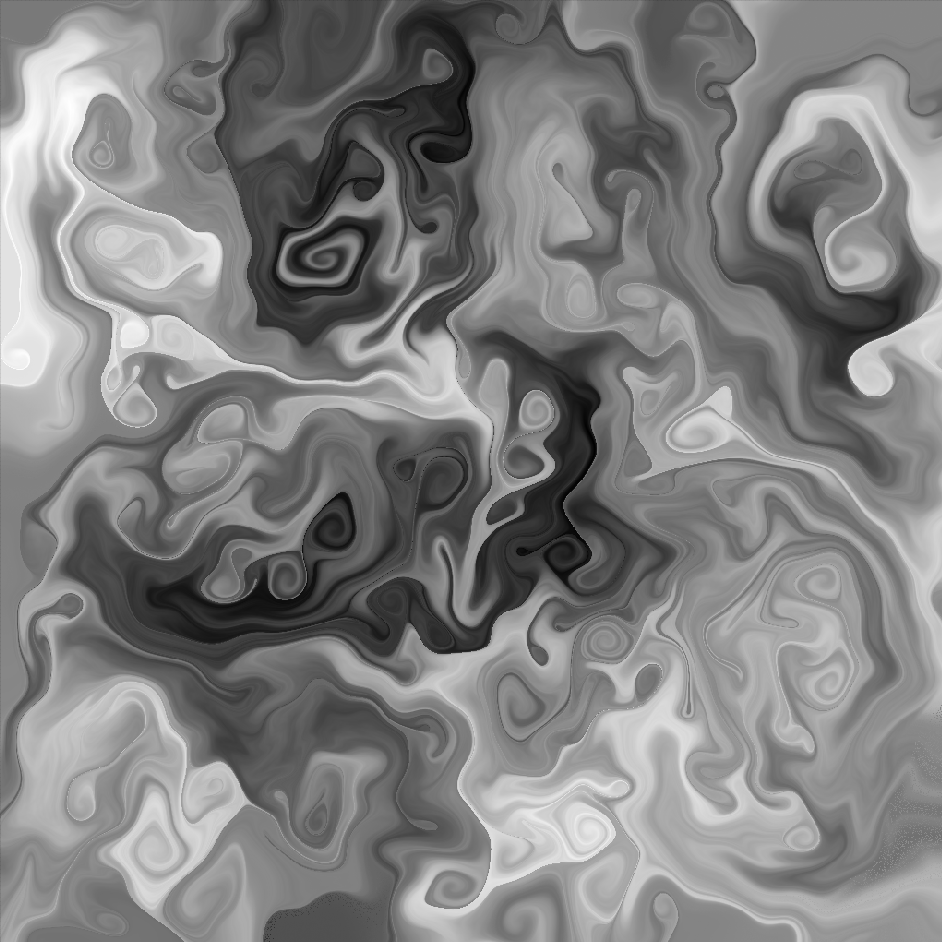
Fig. 13A - Bi-Directional swirls. Look for counter clockwise and clockwise swirls!
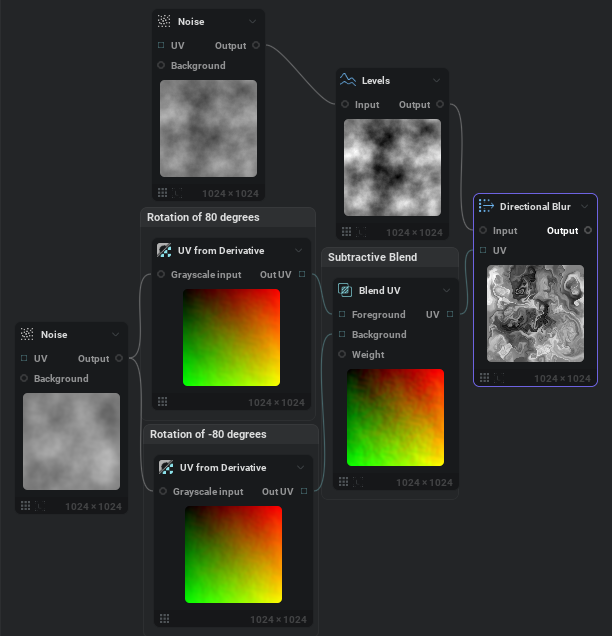
Fig. 13B - Bi-directional curl setup
Then, I wondered if it was possible to have something similar to octaves in our curl noise. Where we have giant curls pushing and defining smaller more refined curls. Luckily this is pretty easy by having one curl with a more global sweeping influence and one curl with intense localized influence. To achieve this we need to use our UV blend node to ADD our two inputs together. It doesn't matter which pin goes in background for foreground. In Fig. 14A you can see the result and in Fig. 14B the node graph
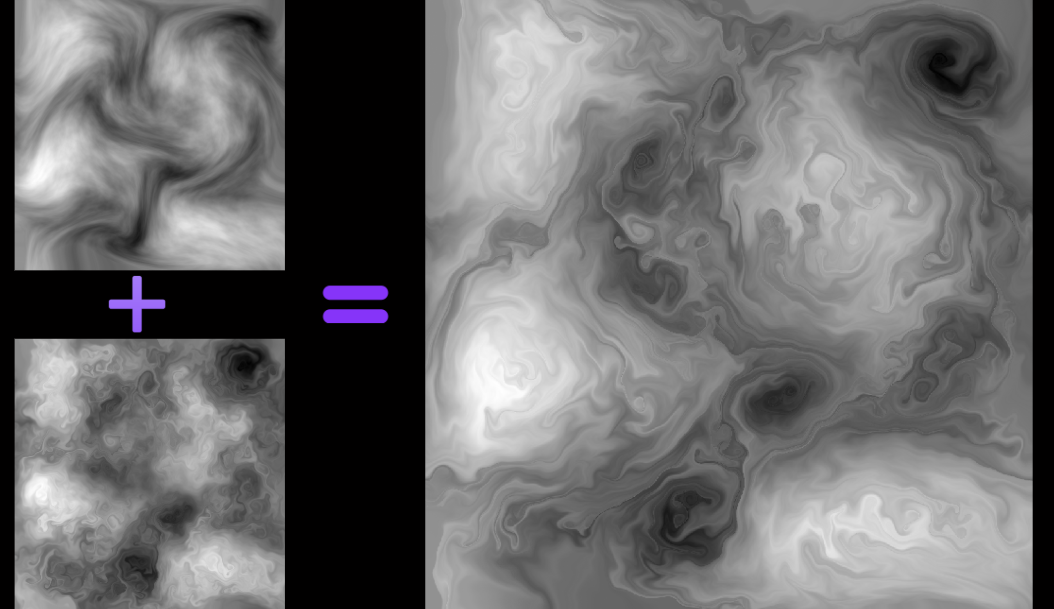
Fig. 14A - Curl with multiple octaves of influence
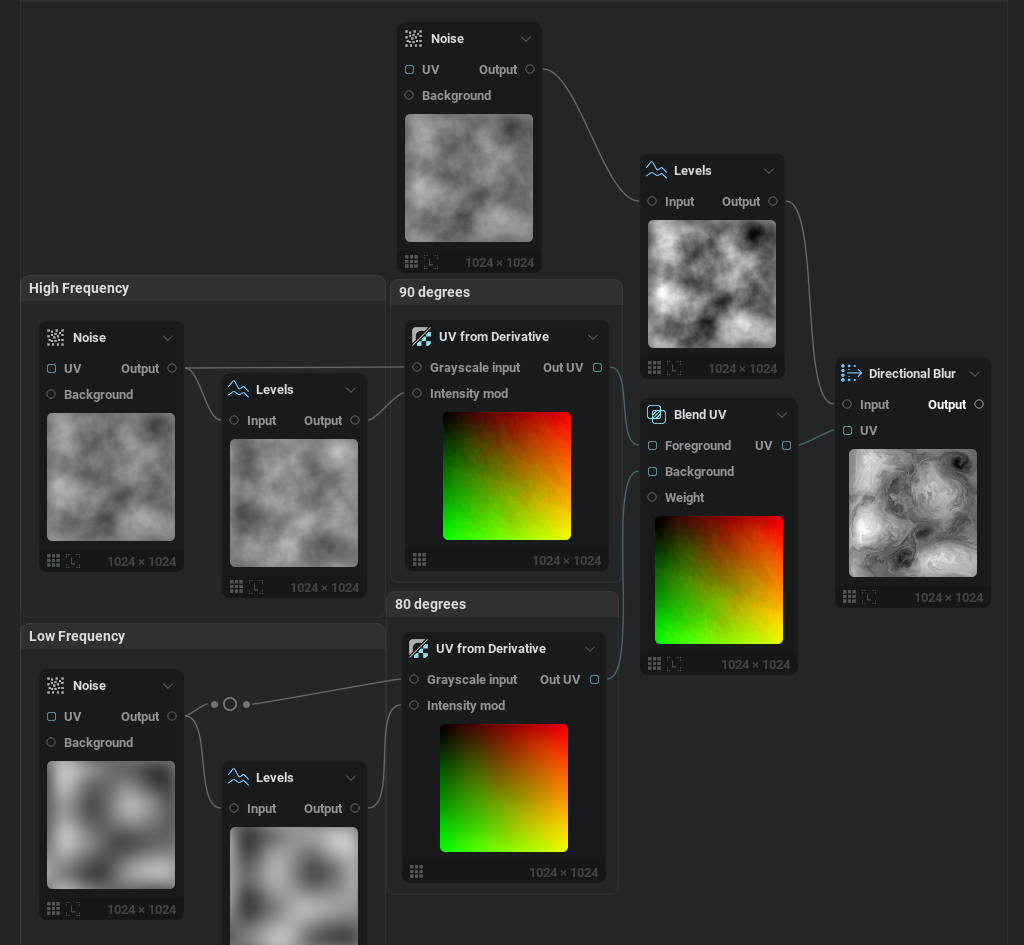
Fig. 14B - Node graph needed for multi-octave curl
Insight #5: Animation can give you great flipbooks!
Up until this point we've dealt with static textures. If you're interested in using curl noise for animated flipbooks or animated noise maps, you need to swap from a noise node as your curl generator to a fractal node. The reason for this is that in IlluGen as it stands today, our 3D noise function does not tile properly with a regular Noise node. In the future this will be fixed, but for now we will rely on a fractal node. To animate your fractal noise you need to enable the 3D noise checkbox as seen in Fig. 15. Then expose your Z position pin either to the timeline to keyframe or to the node graph for use with modulators. The examples should be clear in our project files. From there, your curl noise will begin to come to life. By using other VFX techniques like multiplying scrolling noise together, animating masks, animating erosion, using our curl noise to refract caustics, and so on, we can begin to create unique effects using what we've learned so far.
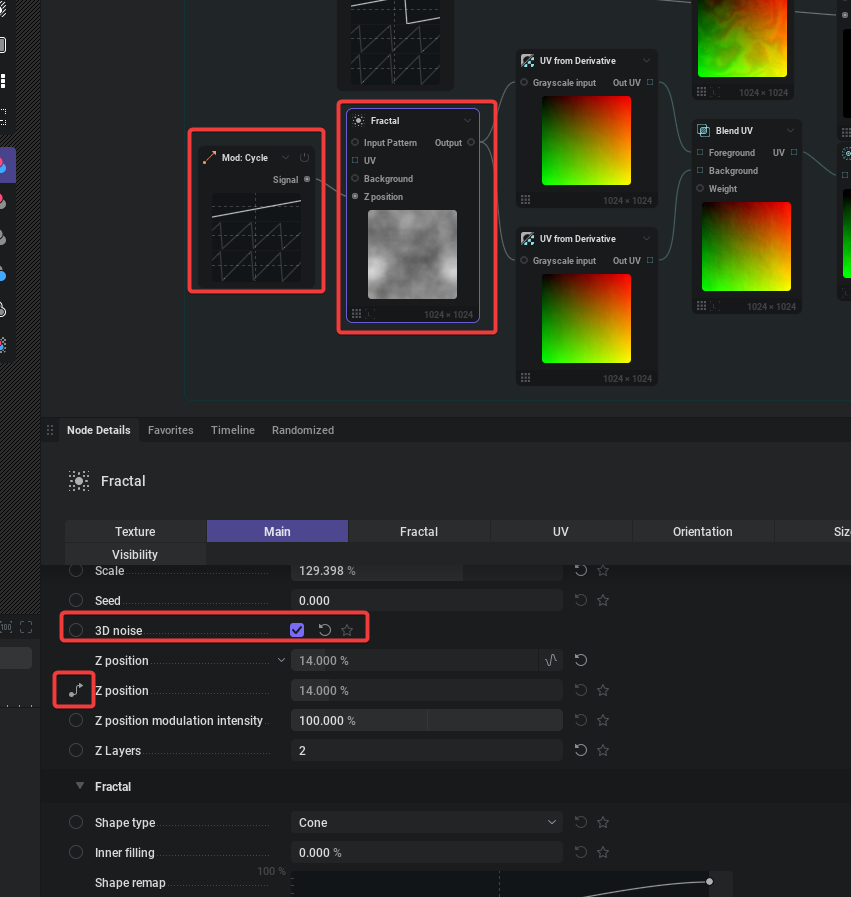
Fig. 15 - How to animate fractal noise
Fig. 15A - Animated Liquid Like Noise
Fig. 15B - Iridescence
Fig. 15C - Magic Wisps
Fig. 15D - Caustic Curls
Insight #6: Curl noise usually won't tile by default in IlluGen (yet)
Curl noise won't tile in IlluGen due to a bug in our directional blur node, this will be fixed in the next update as of Feb 6, 2026. For now, after you have your curl noise texture, you can run it through a tile node and choose between Mirror wrap (Fig. 16), Voronoi sampling, or Scale wrap. None of these are as good as what real tiling would bring, but in most cases you can hide your seams pretty well with one of them.
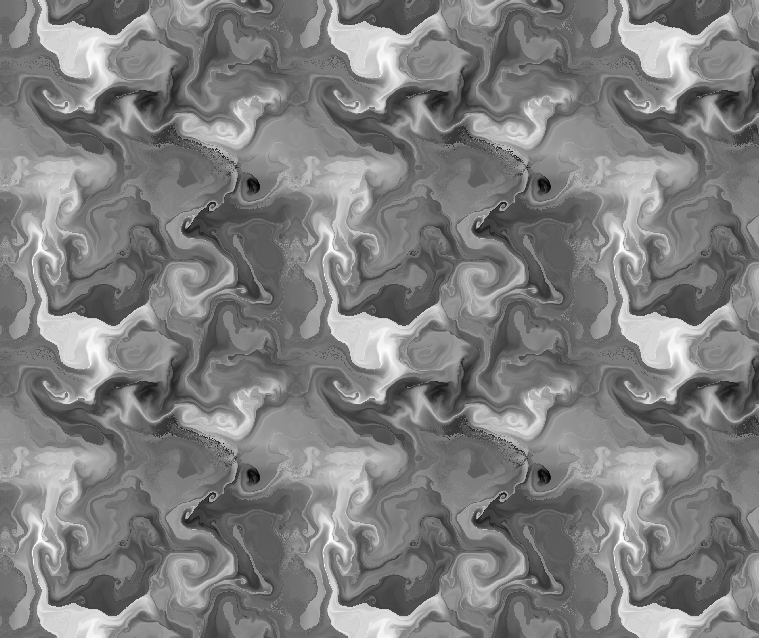
Fig. 16 - Using mirror wrap to tile our curl noise
Insight #7: Experiment with custom input shapes beyond just noise
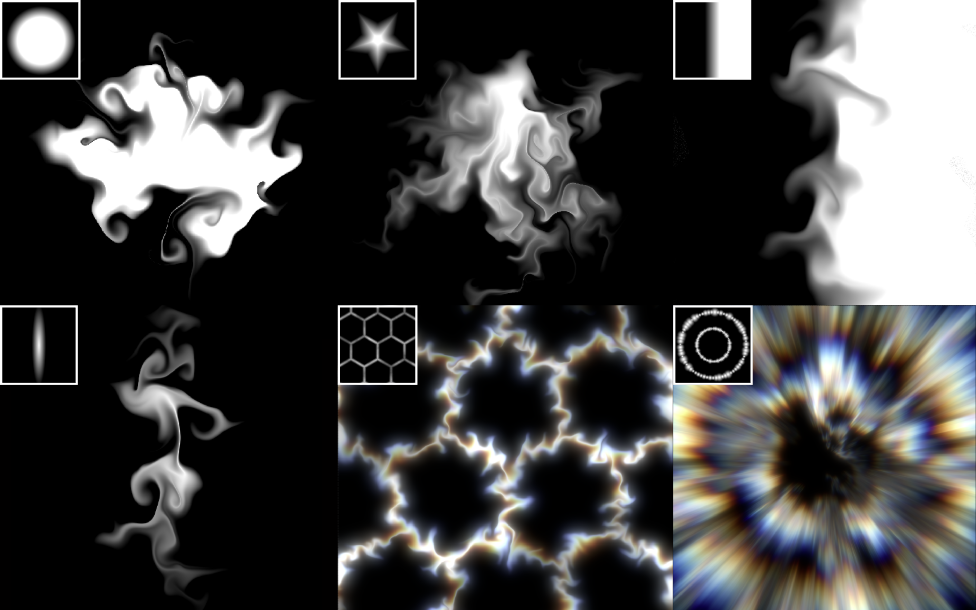
This goes for both the curl input and primarily what you are wanting to distort. By distorting a circle you can generate unique smoke and liquid like masks for erosion or splats. By distorting a linear gradient you can create sharp swirls. There are truly infinite possibilities when it comes to the number of combinations and complexity you can aim for. Most things I've gone over in this article barely start to scratch the surface of the unique things you can pull off with IlluGen.

Fig. 17 - Experiment with custom input shapes and see where it leads!
Thanks for reading! This is my first article for my new newsletter "Gotta be less than 2ms". The focus of my newsletter is on creating real-time vfx for games. If you would like to subscribe to the email list for this particular newsletter, please do so below.
Files: https://jangafx.com/downloads/res/Curl_Tutorial.zip
Heavier Reading & Inspirations:
https://emildziewanowski.com/curl-noise/
https://al-ro.github.io/projects/curl/
https://www.overdraw.xyz/blog/2018/10/23/curl-noise-and-fluid-morph
https://www.shadertoy.com/view/XfS3R3